Matrox IrisGTR Upgrade Procedure
Table of Contents
Procedure for Automatic Upgrade of MIOS
Updating the Matrox Iris GTR BIOS
Procedure for Manual Installation of MIOS via ssh
Procedure for Manual Installation of MIOS from USB key
Procedure for Installing MIOS using the Reset Camera Options menu
Introduction
After installing Matrox Design Assistant X, to connect to an IrisGTR with a DA 5.0 or 5.1 runtime, it will be necessary to upgrade the software on the camera. A new version of the Matrox Imaging Operating System (MIOS) containing the necessary Design Assistant runtime environment will be transferred to the camera and then will be transformed into the current operating system. The new system is distributed as an .iso file.
The MIOS upgrade can be done automatically when the DA design time tries to connect to an IrisGTR with a lower version.
Note: If you require “downgrading” a camera – for example returning it to 5.1, use any of the methods under Additional Procedures.
BIOS upgrade
Typically the new MIOS absolutely requires the camera’s BIOS to be updated. This must be done immediately after upgrading the MIOS.
Procedure for Automatic Upgrade of MIOS
1. Backup any important data from your IrisGTR – the upgrade will wipe all information on the camera’s disk.
a) In particular if you have been making many changes to deployed projects from the Operator View, it is recommended that in Design Assistant you Synchronize recipes between the runtime and the design time project. Import any recipes that you created at runtime and want to keep. After the camera upgrade, you will redeploy the projects.
b) Copy any folders of images or other data that were stored on the IrisGTR that you want to keep.
c) Project Change Validator data is stored on each IrisGTR together with the deployed project. If you have created validation sets that you want to use after the upgrade, make sure to back them up. For example if I have deployed a project called BottleInspection, its validation information is held in \\gtr320xxx\mtxuser\da\Projects\BottleInspection\ValidationSet. After the upgrade, after you have redeployed the project, copy back the ValidationSet folder.

2. Install your new version of Design Assistant (e.g. DA X Version 1905)
3. Connect Remote to your GTR
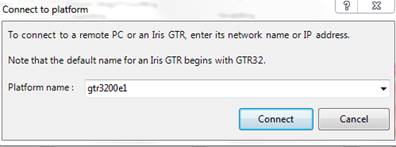
4. It will detect a version mismatch. Click Upgrade if you are ready to upgrade now (backups done?). Note that DA X Version 190x uses internal numbering 6.0.

5. Browse to the location where you placed the .iso file that you downloaded as part of the installation or upgrade package, for example MIOS-01.01.125.001-DA-6.0.189.iso
Acknowledge that you have backed up your data. Click Update

6. The .iso file will be copied to the camera. This may take several minutes for each of the items that get added to the dialog
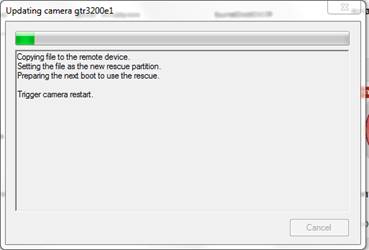
The next stage may take 25 minutes overall – with nothing visibly changing for periods of 5 or 6 minutes.
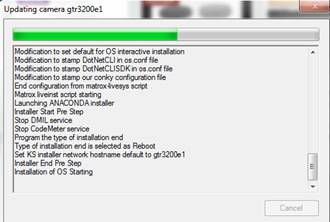
The final stage should be:
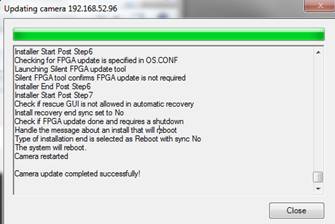
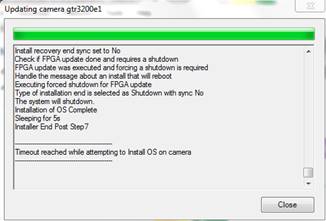
NOTE: A small number of early production cameras do not have the ability to automatically power cycle themselves.
In these rare cases you will be shown the following timeout message. This is normal. Simply power cycle the camera to complete the update.
7. When attempting to connect for the first time to the new OS, you are prompted to accept the EULA. You must follow the link and accept the agreement by clicking on I Agree. The page will change to the Portal Home page.

>>> 
8. UPGRADE THE BIOS following the instructions later in this document
9. Restore any settings that were made in MILConfig. In particular if you had enabled any Industrial communication protocols, and made other configuration changes for Ethernet/IP, Profinet or MODBUS you must make the changes again.
Updating the Matrox Iris GTR BIOS
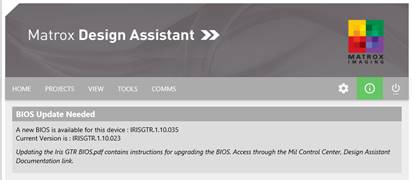
Do I need to update the BIOS?
If a new BIOS has been provided, it is important to install it. You can verify current and available versions
on the camera’s Essential Information portal page.
Procedure
Updating the BIOS is a delicate operation that requires manual user intervention in order to ensure it is executed at the correct moment. It also needs to be done without a power interruption.
Note: If a power failure occurs during the BIOS update process, the camera will have to be sent to Matrox RMA for repair.
The update can be done in different ways. Choose the one that best fits your workflow.
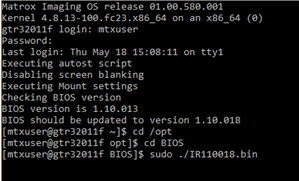
1. Establish a terminal session
· using a local display and mouse/keyboard connected via the camera’s USB/VGA cable
· using a remote connection to the camera’s desktop, e.g. VNC
· using a remote connection to a command line session (e.g. telnet )
2. enter the commands; note that the system is case sensitive and the name of the IR file includes its version number. The following examples shows version 11.0 build 18, but you will probably see a more recent version, for example IR110023.
cd /opt
cd BIOS
sudo ./IR110018.bin
In the rare circumstance that you receive a message “Error: file offset + size...”
Enter the command again, for example
sudo ./IR110018.bin
Screen shots and more detailed instructions for users very unfamiliar with the MIOS or Linux system may be found in the document “Updating the IrisGTR BIOS.pdf”.
Additional Procedures
In situations where it is necessary to change the version of the camera software on a large number of cameras an alternate method may be more efficient.
Note – regardless of which method is used to update the MIOS, you must still verify the BIOS version and, if necessary, update it as described above.
Procedure for Manual Installation of MIOS via ssh
If the IrisGTR is reachable on the network and you are familiar with ssh, putty and linux command lines, you can use an alternate procedure of copying the iso file directly to the camera and issuing the commands to change the recovery iso, and to use the recovery iso on the next boot. If you have a large number of cameras to upgrade, this might be the most efficient approach. Contact Technical support if you require the detailed procedure
1. Copy the iso file to /home/mtxuser on the camera
2. Open an ssh connection with the desired camera using putty, telnet, or equivalent.
· When prompted to log, logon with mtxuser with password Matrox
3. Change recovery iso of the camera to the new iso file copied in the first step. Working in the folder containing the new iso,
· setrescue.sh update MIOS-‘<iso file name>’.iso
4. Configure next boot to start rescue process. Re launch setrescue.sh update with “CURRENT” as a parameter (in uppercase)
· setrescue.sh update CURRENT
5. Reboot unit
· sudo reboot
6. Rescue process should now start
7. When complete, update the BIOS, see below.
Procedure for Manual Installation of MIOS from USB key
If the camera is not reachable through the network, we can also rescue the camera with a USB bootable drive.
1. Burning an ISO to a bootable USB key
a. Connect a blank USB key with a capacity of 2 G bytes, or more to your Microsoft Windows development computer.
b. Launch Rufus (the Reliable USB formatting utility) on your development computer. This utility can be downloaded from the web or from the camera by entering http://gtrxxxx:8080 and clicking on the Rufus link.
c. When using Rufus, make sure to specify a FAT32 partition on your USB key, and to select the appropriate ISO image.
d. Follow all on-screen instructions.
2. Upgrading the MIOS using a USB key
a. Connect your bootable USB key, a monitor, mouse, and keyboard to your Matrox Iris GTR, using a USB hub and the IrisGTR’s USB/VGA cable.
b. Reboot your Matrox Iris GTR. When the BIOS logo appears, press the ESC key to open the BIOS utility menu.
c. When the BIOS utility menu opens, select the Boot Manager utility icon to load the BIOS boot device menu.
d. On the BIOS boot device menu, select the Legacy USB entries option. Matrox Iris GTR will then boot from the USB key.
e. After the Welcome to Matrox Imaging operating system dialog appears, select Install to Hard Drive option. Warning! This will replace the contents of your hard drive.
f. Follow all on-screen instructions.
3. When complete, update the BIOS, see below.
Procedure for Installing MIOS using the Reset Camera Options menu
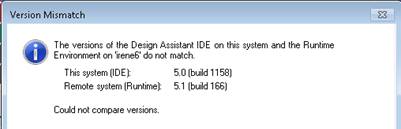
A DA 5.0 IDE design time trying to connect to an IrisGTR with a newer runtime platform will show the following message.
If you wish to “downgrade” the IrisGTR, use the Design Assistant Platform menu IrisGTR>> Reset Camera Contents option. Browse to the location where you have the .iso file for the version you wish to downgrade to, for example MIOS-01.00.589.001-DA-5.0.1158. After making a backup of information you wish to keep, as described at the beginning of this document, click Update to install the iso.
